In any organization, there always comes a time when you perform a rather complex sequential order of events on a computer application, and you’d like to be able to share this process with others. Maybe it’s the 10 step process for setting up a new office printer, and all your colleagues would benefit from having a step by step guide. Or maybe its a crucial yet important setting that must be activated on an application; yet, you use this function just infrequently enough to remember how to do it every time. This is another case where it would be nice to quickly set up some documentation to capture knowledge and save for future reference. Complex or not, some tasks just benefit from being captured and transferred into recorded information. For the most part, this type of information is called explicit knowledge, meaning it can be readily articulated, accessed, verbalized, and therefore can be easily transmitted to others. In contrast, tacit knowledge is skills, ideas and experiences that a person cannot readily transfer or codify. As an example, you can’t really create a one page instruction sheet for riding a bike or learning a language, can you?
Now, this post is about how to visually capture your sequential steps for performing a particular action on a computer. For very simple tasks, or if you truly understand your audience, you might be able to get away with just writing out your steps in order, as if they were directions to a friend’s house. In the Microsoft Windows environment, for example, you’ve probably seen simple instructions looking something like this:
Start>Control Panel>Printers>Left click printer icon>uncheck box called “set as default”
Sometimes this approach works, but all other cases will highly benefit from visual aids. This entails capturing screen shots of moments in time on your screen to help support the text-based instructions. This could be either images or video.
Below I have listed and explained three ways in which i recommend creating easy instructions with screen capture methods.
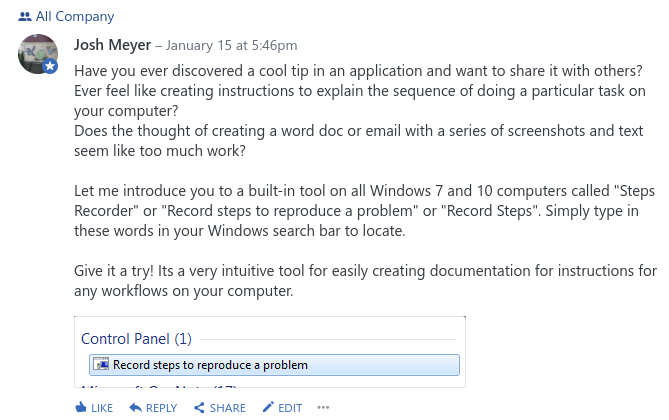
1. Microsoft Windows’ built in “Record steps” feature
The first method I want to introduce is the “Record steps” feature in nearly all PCs. It’s a built-in Windows application that is traditionally meant for tech support and troubleshooting, but it also works very well to document a sequence of steps. The way it works is that you open the application, turn on the app, and it will take a picture of your screen everytime you perform an action on your PC. Even better, it also automatically annotates your actions by typing out your actions along with each screenshot. For example, if you selected the button titled “continue” in the left side of the screen, the application will in fact list on that given screenshot instructions to click on the “continue” button on the left side of the screen. Its pretty brilliant! After you tell the app to stop recording, it produces a file that can viewed in any browser, or could also export to a PDF.
This application and method is probably the most simple and intuitive strategy, and can be deployed by anyone who knows how to use a computer. I would encourage all of your coworkers to know about this feature for sharing such explicit knowledge. Mac users: I don’t think there’s a comparable app, but they do have a built in video capture feature that could substitute.
I actually discovered the “Record steps” feature only recently, and it’s really been exciting to explore and talk about. I recently posted the news to my company’s knowledge sharing platform.
2. Using a screen clipper in tandem with Word or MS Paint
The second capture method is likely the most common approach used these days to communicate visual computer-based instructions and steps to take. It involves clipping sections of your screen and desired intervals, and then pasting them into a document to support existing text. Some people default to using the “print screen” button on their computer, and then take extra steps to crop in a photo editing program before dropping into a document. But there are more efficient ways. I recommend using a web clipping tool that can capture a targeted section of your screen. I personally use OneNote, which has a great built in clipping tool, but there are many browser based tools and plugins that can be found online.
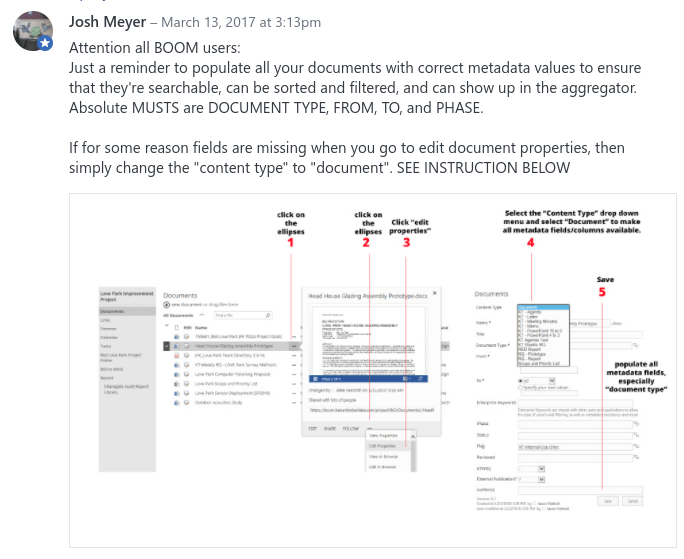
The example below is an instruction I created to remind my users how to fill out metadata in our document management platform. I used the OneNote clipper to isolate certain areas on the screen to grab, and then inserted them in Photoshop with arrows and text to annotate. One could also use very simple programs like MS Paint. With this example, the instruction was just a few steps and could be communicated clearly on one page. Multiple step instructions work best in Word documents.
The main point i want to emphasize here is to think beyond the “print screen” button and harness the great capabilities of a good screen clipping tool for sharing and documenting ideas and concepts. I use my clipper tool all the time to quickly email images in one click, or to grab images on my screen that are difficult to save.
3. Screen capture software in video format
The third and final method i want to mention is for those who want to kick it up a notch and want a video output. These are best if you have a very long and more complex instruction, and acknowledge that this would be the best use of time for both yourself and the user to experience this in real time.
There’s a ton of software out there that educators and content creators use for creating instructional videos. Some have built in capture features that document or acknowledge when you click and navigate on your screen, and some are more so traditional screen recorders. In the latter case, you would have to rely more so on the narrator to explain the sequence of steps. In terms of software available, I have used both Camtasia and Adobe Captivate to create instructional videos on how to use software or perform certain actions on computers with good success. There’s many more options out there, and most can probably be had with 15 day trial periods.
I recommend pursuing the video route if you’re interested in a more interactive deliverable, or if you’re planning to create a large series of instructions that defines a body of work. I recently helped to develop and create an interactive digital handbook and guide full of instructions on how to interact with company platforms. It contained both text, images, and videos depending on the scale of detail needed, and to this day is a wonderful reference that can be accessed by all in the office.
Building a culture of sharing instructional knowledge
While this post so far has been about identifying methods to capture instructional knowledge, I also want to approach this topic through the organizational development lens and furthermore briefly talk about what this concept means for your organization’s culture.
First, leaders need to recognize the value of rewarding employees for sharing what they know with others. If only one person in the office knows how to do a mission critical task, then this risk should be approached as an opportunity in knowledge sharing, deploying some of the methods above. However, this issue can sometimes become sensitive with more tenured staff who hoard knowledge for job security. That’s why it’s important to create a culture of knowledge sharing where people are able to maintain both credit and ownership of knowledge. This concept is at present realized in the digital age, where documents contain metadata fields to list document creators, owners, and other vital legacy information. Content creators can these days easily get their credit where the credit is due and move on to more innovative projects instead of carefully guarding their IP, which is technically owned by the company.
The truth is that we live in a creative economy where sharing is vital to successful collaborations and relationships. In this amazing information age, we are learning countless new things everyday and we must be in the right mindset to share information that helps meet organizational goals. Coworkers and peers should be continually engaged in a dialog of knowing how to access all of the important “how-tos” documentation. As an example, it’s perfectly fine if Linda is your go-to gal who everyone knows handles all of the digital subscriptions information in the office. However, it’s not perfectly fine if she does not have a transparent method for transferring this information. The good news is that any effective leader can gain the skills to build this culture, and those who believe in your organization will get behind this concept. If you do not have employees who can accept a culture of sharing, then they probably are not suited to your long term goals.
